Friday, January 25, 2013

A Little Rock 'n' Roll...or Just Roll

I'm just gonna pop in here for a quick update about some delicious experiments I've recently been part of. Now let me just tell you a little secret, until a month ago I had never made a jelly roll before. Shame.
 
I know. And I am now unsure of why this took me so long to do because they really are wonderful
 
For Christmas, yes that was like a month ago, my mother and I made some jelly rolls for dessert and I've just neglected to post them until now.
 
 
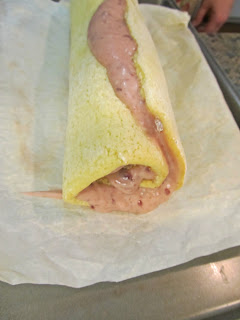
This is them. One is simply raspberry and the other is raspberry and cream cheese. And once again, because I love you all so, here's a quick picture tutorial.
 
We used this recipe but I'm sure any light cake would work. So as soon as you take the cake out of the oven, dump it onto a tea towel sprinkled with icing sugar. Roll the cake in the towel and place it seem down for ten minutes.
 
 
Next you want to unroll the towel and the cake and spread it with...well whatever you want to spread it with. Jam is always good or a cream cheese mixture.
 
 
Roll the cake up again and place seem down on a tray in the fridge until it hardens up a bit. Don't worry if it looks like a mess at this stage...it gets better.

 
Dust the roll with icing sugar or cocoa, again it's up to you, and cut into inch thick pieces. Or on that note, however thick of pieces you want!
 
 
These were incredibly moist and delicious! And can you guess what else I liked about it?
 
It
 
was
 
easy!
 
But wait! There's another recipe coming at you!
 

Strawberry Shortcake SUSHI!

I made these for a recent girls night with mon amigos. The link take you to a phenomenal website that does a great job at explaining the process. It's very similar to the regular jelly roll only smaller!


Now try eating these with chopsticks. Ha, it created a few good laughs for us!

Well I hope your week was fabulous, as you all are.
Enjoy,
Sydney :)


Saturday, January 19, 2013

Life's for the Living, so Live It.


Well January has come and almost gone already. And here I sit, wondering why it took me so long to do so many things. Let me explain.
 
Knitting. Ah, it`s such a fine art. And well, to my disappointment I failed at it when I tried to learn a year ago. But never fear! Okay so you probably weren't too concerned that I couldn't knit..but I was pretty upset. Now let's fast forward to the present time. I can knit! What?! I know, I was super excited. I don`t know what happened but my sister learned and then she taught me and now I can knit. Ahh, I feel like I've conquered the world.
 
But wait!
 
There's more!
 
So if you've been following me for a while you've probably seen this post. And from that post you can probably understand that my musical skills are about this big...(I'm using my fingers to show a very small area). But guess what? I bought a guitar. A guitar for someone who is not musical? Yes, because I can decently play it....I can play guitar. Did you get that? Me, Sydney, can play guitar! Probably more exciting to me than to you, but nonetheless, I am also excited about this.
 
AAAAAaannnndddd, one more thing.
 
I got 100% on my chemistry test this past week. Yay me! Congratulatory prizes can be mailed or delivered to my house week days after four o'clock.
 
Well, that's about all of my life goals accomplished within the month of January. Time to start shooting higher I guess.
 
On another note, I got to hang out with a wonderful young lady a few weeks ago. Michelle. Michelle is a gem. Michelle is adorable. Michelle is a wonderful baker. Now would be the time when you all start to be jealous that you don't know Michelle.
 
Well me and Michelle baked up some cookies and turned them into sweet little presents.
 
 
Adorable, right? We kind of thought so.
 
And can I tell you the best part?! It's super simple! Yes, folks, this is my favorite thing about everything. Simplicity is indeed bliss.
 
And because I love you all so much, I stopped to take step-by-step pictures just so you can make these yourself.
 
You're welcome.
 
Alrighty, so make a batch of regular sugar cookies with a variety of colors. Roll them out and cut them into squares. We used a cardboard template and traced them out.
 

Take a stack of four cookies and use some melted chocolate to pipe a line of "glue" around the edge of the bottom cookie.


For the middle two cookies, you'll want to cut a small circle out of the middle to create a spot for the candy to go into later on. Continue "gluing" and stacking until you get to the top cookie.

 
Fill the "present" with candy of your choice. We used M&M's, but any small sized candy will do. Only put melted chocolate in two corners of the third cookie so the "lid" is easier to remove.
 
 
And there you have it! A little bundle of sugar. But what present is complete without a ribbon? Take a strand of pull-apart licorice and attempt to tie it around the present. This proved to be harder than it looked. But after a few attempted methods, we got the hang of it.
 
 
We ended up tying two licorice strands around each present, but suit yourself.
 
 
Aren't they just the cutest thing ever? A tad bit time consuming but the product makes it worth it. Plus I got to spend time with the darling Michelle, mentioned earlier. So grab a friend and get going on some cookies!
 
 
Take care and stay warm.
With love,
Sydney